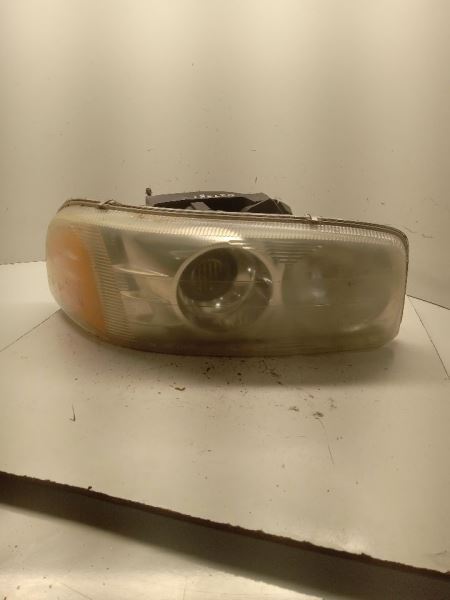
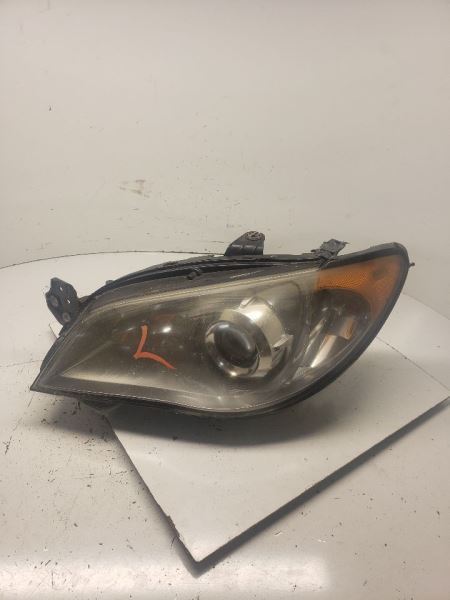
2x Glass Lens Headlights Headlamps Set for Chevy/GMC C10 C/K 1988-1998 GM2503101
$ 44.88
Description
Shop Sale items New Arrival About US Store Categories Fuel Systems Accessories Engine Parts & Oil Pump Radiator & Condenser & AC Sensors Transmission Crankshaft & Camshaft Timing Parts Ignition Systems Cylinder Piston Kit & Actuator Power Steering Systems Rods & Coilovers Leveling Lift Kit & Rocker Arm Driveshaft Window Parts ECM & DCM Headlight Assembly Intake &Exhaust Systems Turbochargers Water Pump & Vacuum Pump Brake System Wheel Parts Suspension Systems Throttle Body Glow Plug Starter & Flameout Systems Alternator & Generator Carburetors Pressure Gauge Series Electrical Accessories Other Hot Item 1 Row Aluminum Radiator For Toyota Tundra 2000-2006 for Sequoia 4.7L V8 2001-07 147.99 USD Free shipping Power Steering Rack & Pinion Assembly For Chevy Trailblazer GMC Envoy 2003-2009 189.99 USD 199.99 USD Free shipping 5% off Power Steering Pump w/Pulley & Reservoir For Buick Rainier Chevrolet Trailblazer 99.99 USD 109.99 USD Free shipping 9% off Power Steering Rack & Pinion Assembly for Chevy Trailblazer GMC Envoy 19207782 214.99 USD 229.99 USD Free shipping 7% off Payment Options 2x Glass Lens Headlights Headlamps Set for Chevy/GMC C10 C/K 1988-1998 GM2503101 We have lots of products for sale in our store. If you would like to buy others, please don't hesitate to contact us, we will give you the biggest purchase discount. Please confirm your interchange part number before placing an order. Application: For Chevy C/K 1994-1999 headlights Specifications: Lighting Technology: Halogen Housing Color: Black Lens Cover Color: Clear OEM/Interchange Part Number: GM2503101, GM2502101 Package Included: 1x Headlight Right Passenger Side 1x Headlight Left Driver Side Features: High-quality ABS with a good seal, resist dust and water out on the road. SAE & DOT Approved: Inspected in 3 steps and vacuum tested to insure lenses are IP67 waterproof and air-tight without any fog inside. UV protection design to avoid peeling issue. Our headlights assembly are made of ABS plastic and polycarbonate lens. Give you a clear vision in all kinds of weather. DURABILITY & STRENGTH - ABS plastic black housing provides excellent resistance and durable lifespan. It can protect the headlight from bad weather condition such as rain and snow. Clear headlight lens feature with good transmission and high toughness. Improves visibility of road markings and reduces the rate of traffic accidents. Our professional technicians do heavy research and development in testing car applications and fitments for our products. Easy Installation:Plug and Play, Comes with OE connector & Clips, Direct fit into mounting hole. No extra modification. High/low beam adjuster for meeting different needs. Note:High/Low Beam NOT INCLUDE! COMMON CAUSES OF HEADLAMP CONDENSATION 1. Large changes in daily temperature (+/-30℃/105℉) 2. Water vapor easily collects as dew point or humidity increases I 3. Leaking seals on bulbs and/or bulb sockets This is a common occurrence and won’t affect the headlight function HOW TO SOLVE: 1. Check that all vents are free from blockages. Turn on the low beam for 20 mins to raise the headlight temperature and evaporate condensation. 2. Remove bulbs to allow moisture to evaporate from inside the housing. Heat with a hairdryer or heat gun at a low temperature to speed up the process. 3. Leaking seals on bulbs or bulb sockets. Put moisture-absorbing silica-gel desiccant packet inside the headlight. Installation: Install: 1.Undo the screws, clips, or retainer springs that hold the headlight in place. 2.Disconnect the wiring from the assembly. 3.Detach the headlight from the vehicle to replace it with a new one. 4.Fit in the new headlight assembly. 5.Fix the new headlight into place and make sure that the screws, clips, or retainer springs used are sealed. 6.Reconnect the wiring that was unplugged from the assembly. 7.Put back the grille and other components that you removed. Seal them back into place. 8.Test the new assembly. Adjust: Before you begin to adjust the light, make sure check the alignment of your lights first. Park the vehicle about 10 to 25 feet from the wall with the lights aimed at the wall. The centerlines of the headlights should not be any higher than 3.5 feet above the ground. 1. Find the adjustment screws: Firstly, locate the adjustment screws on your vehicle. 2. Adjust the headlights individually: The headlights should be adjusted one at a time. Put a rag or towel over a chair in front of the light you want to block. Covering the light assembly directly can damage the plastic lens. 3. Adjust the vertical field: The screw on the top of the light housing should be turned clockwise to raise the lights and counterclockwise will lower the light. The headlight should be adjusted until the top of the most intense part of the light beam shines directly on or just below the center of the tape line on the wall. 4. Adjust the horizontal field: The screw on the side of the light housing should be turned to get the right/left adjustment correct. Adjust the lens so that the most intense part of the beam is to the right of the vertical line. 5. Test your results About Us Payment Shipping Returns Contact Us On Nov 20, 2024 at 04:53:05 PST, seller added the following information: